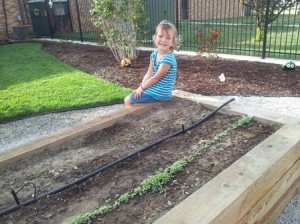
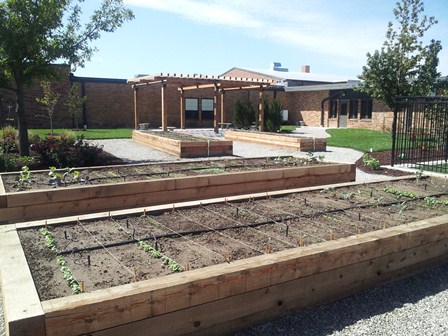
As you can see, the learning garden has sprouted:

I have found that many teachers want to incorporate a learning garden into their curriculum but do not know how to garden. This is not a big issue for the teachers if they collaborate with an experienced gardener, horticulture agent, garden club, or master gardener to help train the teachers. Within a school district and community, I bet there is at least one gardener who would be willing to train the teachers on the basics.
In our first year with the learning garden, it is imperative that we equip and train our teachers so that initial success can be gained. We took the “learning by doing” approach with the training sessions. In fact, I taught the teachers how to garden at the same time we taught the students. Thankfully, I have the time to volunteer at the school and be in the garden when the teachers and students are available.
I provided a garden guide obtained from the local extension office that provides basic gardening directions. This will be a great resource for teachers and students to review as garden questions arise. We reviewed the garden guide and determined what vegetables would be tasty and appealing to the students. The vegetable transplants and seeds were purchased at a local garden center. The local garden center is a great place to get your seeds; they are going to sell seeds that will do well locally and in your climate.
I will also be providing the Nutrients for Life education materials, which are available free of charge. Nutrients for Life provides free soil science curriculum and materials, including posters, resource guides, flashcards, and mini-grants. The curriculum, Nourishing the Planet in the 21st Century, addresses key objectives from the National Science Education Standards and has been reviewed by the Smithsonian Institution. The modules for elementary, middle, and high school classrooms provide hands-on activities and lessons to show how the challenge of feeding our world’s growing population can be solved with science.
On planting day, I demonstrated how to:
- prepare the soil
- dig a hole and plant a transplant
- use a string to make straight lines
- make a furrow to sow the seeds
- sow the seeds and plant at the proper depth
- water properly
During the demonstration, we talked about what is in the soil – air, water, and nutrients; and the requirements for a seed to germinate and sprout. It is gardening basics, but if you have never done it before, soil and seeds can be a bit intimidating.
After my demonstration, the teachers led the students in planting their first learning garden. It was a great day! Hands were dirty and kids were learning.
My job of “teaching the teacher” is not complete until they have had a successful harvest.
Other demonstrations to complete include how to:
- thin the seedlings
- mulch the transplants
- find and manage insect damage
- add nutrients to the soil
- harvest their vegetables
I have made myself available to the teachers to answer any questions they have. I also e-mail them general garden information that would be helpful as they continue gardening. Short “how to” videos have also proven to be beneficial.
Throughout there year, there are groups that provide garden/agricultural training to teachers. We continue to forward that information on to our teachers and encourage them to gain this professional development. The teachers that have attended these workshops have shown more confidence in the learning garden.
We all want this garden season to be successful, but my personal success will be measured by the gardening skills gained by each teachers and their ability to use the garden as an effective educational tool for our students.

Read more about classroom gardens in our Learning Garden blog series:
Learning Garden 12: Teach the Teacher
Learning Garden 11: Planting Day
Learning Garden 10: How Does Your School’s Garden Grow?
Learning Garden 9: Rain Barrels
Learning Garden 8: Plant Selection
Learning Garden 7: Raised Beds
Learning Garden 4: Designing the Garden


Hello, my name is Natilie Perkins and I would like the demensions of the raised garden boxes in the picture. I just started a garden club at my son’s school and we are in dire need of places to grow the veggies. The school is VERY old and the principal doesn’t want us to plant in the ground for fear of soil contaminants. There are parents that are very resourceful and have offered to build the boxes. The boxes you have are exactly what I had in mind for our garden. Thank You!
Natalie,
The garden beds in the picture are 20 x 6 and are made out of cedar. The advantage of the raised beds are that you have 100% control over the soil that you put in the beds. Raised bed gardening has been very successful in schools. Consider putting the beds near a water source or have irrigation brought to the beds. I also wrote a blog on building a raised bed. http://dev.nutrientsforlife.org/2011/04/building-a-raised-bed-vegetable-garden
Building the school garden has been a lot of work, but has also been very rewarding!! The kids recently harvested and eaten radishes and lettuce. They hold their teachers accountable and continually ask to garden! Good Luck and Happy Gardening. Let us know if we can help in any other way!
If you are plainning to plant with deep root syestm (carrots ) you will need at least 8 . For regular rooting crop like tomato, squash . 6 should be enough. Make sur that your bed is wide enough to allow root spreading and to allow the heat to disipate. Water retention will also be lower in a smaller bed. In a warm zone this can mean more watering. Use a mixture base with a good compost rather than peat moss.Marc